지금까지 Full stack 앱을 작성 하였고 이제 작업한 앱을 누구나 엑세스 할수 있도록 호스팅하는 방법을 알아보도록 하겠습니다. 가장 먼저 해야 할일은 Front End를 빌드 하고 Back End에서 호스팅하도록 하는것입니다.
먼저 Front End를 빌드하겠습니다. 클라이언트 폴더로 이동을 한후 다음의 명령어를 입력합니다.
npm run build위의 명령어를 통해 개발자가 친화적인 코드를 브라우저 친화적인 코드로 변경하여 build폴더안에 저장합니다.
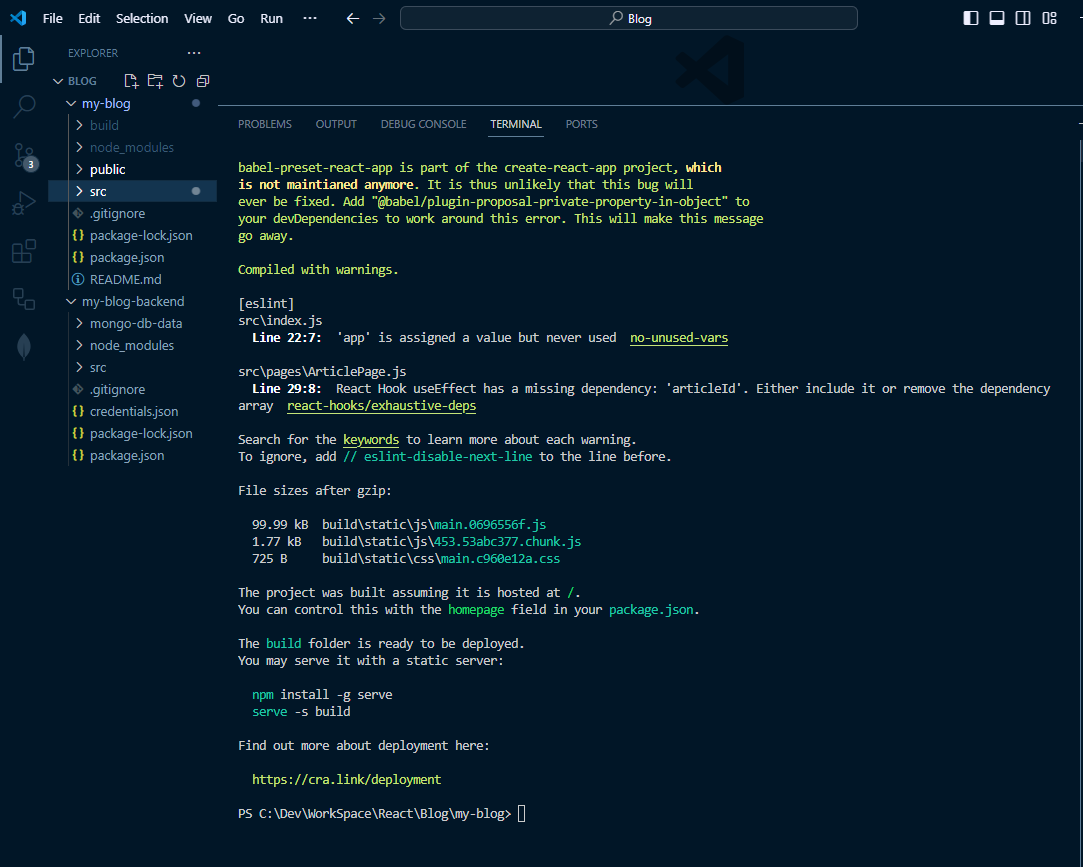
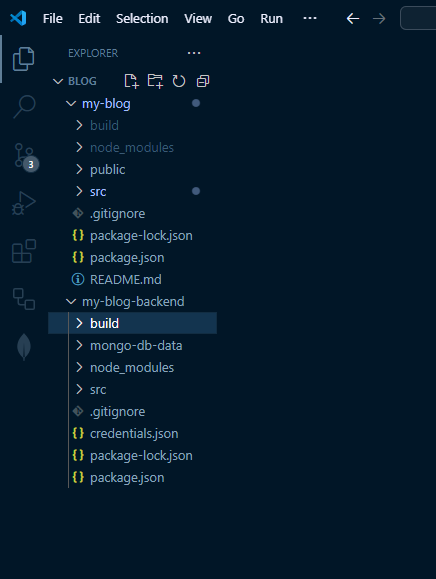
현재 Front End를 개발하는 동안 앱을 호스팅한것은 Reacts 안의 내장 개발 서버였습니다. 그러나 실제 프로덕션에서는 노드 서버에서 호스팅 해야합니다. 그래서 Front End에서 빌드한 build폴더를 카피해서 Back End에 저장합니다.
그 다음으로 할일은 이제 Back End 서버에서 위에 빌드한 클라이언트를 Express에서 사용가능하게 하는것입니다.
그러기 위해서 빌드한 파일들을 읽어 낼수 있도록 경로 작업을 하고 Url패스 작업도 합니다. api로 들어오는 경로 외에는 빌드한 경로로 보내는 작업을 정규표현식을 사용하여 작업합니다. Express에서 서버는 api경로를 사용한 이유가 여기에 있습니다. 그리고 한가지 더 서버를 변경하여 런타임에 수신 대기해야하는 포트를 알수 있도록 처리합니다. 호스팅플랫폼이 사용하는 포트에서 수신대기를 해야하기 때문입니다.
import fs from 'fs';
import path from 'path';
import admin from 'firebase-admin';
import express from 'express';
import { db, connectToDb } from './db.js';

import { fileURLToPath } from 'url';
const __filename = fileURLToPath(import.meta.url);
const __dirname = path.dirname(__filename);

const credentials = JSON.parse(
    fs.readFileSync('./credentials.json')
);
admin.initializeApp({
    credential: admin.credential.cert(credentials),
});

const app = express();
app.use(express.json());
app.use(express.static(path.join(__dirname, '../build')));

// url path manuplate : send to build folder except api path
app.get(/^(?!\/api).+/, (req, res) => {
    res.sendFile(path.join(__dirname, '../build/index.html'));
})

app.use(async (req, res, next) => {
    const { authtoken } = req.headers;

    if (authtoken) {
        try {
            req.user = await admin.auth().verifyIdToken(authtoken);
        } catch (e) {
            return res.sendStatus(400);
        }
    }

    req.user = req.user || {};

    next();
});

app.get('/api/articles/:name', async (req, res) => {
    const { name } = req.params;
    const { uid } = req.user;

    const article = await db.collection('articles').findOne({ name });

    if (article) {
        const upvoteIds = article.upvoteIds || [];
        article.canUpvote = uid && !upvoteIds.includes(uid);
        res.json(article);
    } else {
        res.sendStatus(404);
    }
});

app.use((req, res, next) => {
    if (req.user) {
        next();
    } else {
        res.sendStatus(401);
    }
});

app.put('/api/articles/:name/upvote', async (req, res) => {
    const { name } = req.params;
    const { uid } = req.user;

    const article = await db.collection('articles').findOne({ name });

    if (article) {
        const upvoteIds = article.upvoteIds || [];
        const canUpvote = uid && !upvoteIds.includes(uid);

        if (canUpvote) {
            await db.collection('articles').updateOne({ name }, {
                $inc: { upvotes: 1 },
                $push: { upvoteIds: uid },
            });
        }

        const updatedArticle = await db.collection('articles').findOne({ name });
        res.json(updatedArticle);
    } else {
        res.send('That article doesn\'t exist');
    }
});

app.post('/api/articles/:name/comments', async (req, res) => {
    const { name } = req.params;
    const { text } = req.body;
    const { email } = req.user;

    await db.collection('articles').updateOne({ name }, {
        $push: { comments: { postedBy: email, text } },
    });
    const article = await db.collection('articles').findOne({ name });

    if (article) {
        res.json(article);
    } else {
        res.send('That article doesn\'t exist!');
    }
});

const PORT = process.env.PORT || 8000; // dev mode port number is 8000

connectToDb(() => {
    console.log('Successfully connected to database!');
    app.listen(PORT, () => {
        console.log('Server is listening on port ' + PORT);
    });
})
이 작업으로 이제 서버를 시작함과 동시에 Front End도 포트번호 3000이 아닌 포트번호 8000으로 같이 시작시킬수 있습니다.
'PROGRAMING > FULL STACK' 카테고리의 다른 글
| [Host] Rebuild and Deploy (2) | 2024.03.28 |
|---|---|
| [Host] Setting up hosting for MongoDB (0) | 2024.03.28 |
| [Auth] Making interface adjustments for authenticated users (1) | 2024.03.28 |
| [Auth] Making Requests with auth tokens (0) | 2024.03.28 |
| [Auth] Protecting the upvote and comment endpoints (0) | 2024.03.26 |